How to create a Donation Contract | Solidity Tutorial

This article explains how to create a donation contract using Solidity.
Things you can create:
✨I've created Ethereum dApps
— Manabu (@manabubannai) March 28, 2022
This project is for learning of Solidity, showing the people who donate money to this website.
I'll create a tutorial on how to make this kind of app as a next step📝https://t.co/ZiMfBwz6Mi pic.twitter.com/GrxFlGkclW
You can use the app from this link. Please install Metamask and choose Goerli Network before using it.
You can download all files:
Unfortunately, the code above is a little bit confusing because I use many JavaScript to sort data on Front End.
To make this tutorial simple, we are going to create a very basic app like this:

It looks like boring, but you can create a complicated one after studying the basic one. So let's begin.
Table of contents
- 1. Create a Donation Contract
- 1-1. Struct
- 1-2. Mapping
- 1-3. function public payable
- 2. Create a Front End with JS
- 2-1. Basic HTML
- 2-2. Enable web3.js
- 2-3. Load from Smart contract
- 2-4. Read from Smart contract
- 2-5. Write to Smart contract
1. Create a Donation Contract
All the code of donation contract is below:
There are three points you should learn.
- (1) Struct
- (2) Mapping
- (3) Payable
So let's dig in one by one.
*You can always test your code using Remix. It's much better to use it and test your code by reading this article.
(1) Struct
You can define your type by creating a Struct.
For example, if you want to keep track of your books in a library, you might want to track the followings:
- Title
- Author
- Book ID
In this case, you can use Struct as follows:
struct Book {
    string title;
    string author;
    uint book_id;
}
It's easy, right? So this time, we want to create a Donation Contract, so we need to write a code like this:
struct Person {
    uint id; // Donor's ID
    string name; // Donor's name
    uint256 amount; // Donor's amount of a donation
    address sender_address; // Donor's wallet address
}
After that, we set the default value as zero like so:
uint256 id = 0;
Okay. Let's move to the next step.
(2) Mapping
Mapping is a reference type as arrays and structs. You can use it like this:
mapping ( A => B ) public mappingName
For example, we can use it like so:
contract MyContract {

    // Define the data
    constructor() {
        names[101] = "Jon";
        names[102] = "Sara";
        names[103] = "Paul";
    }

    // Mapping the data
    mapping ( uint => string ) public names;
}
If we deploy the code above, we can get the function like so:
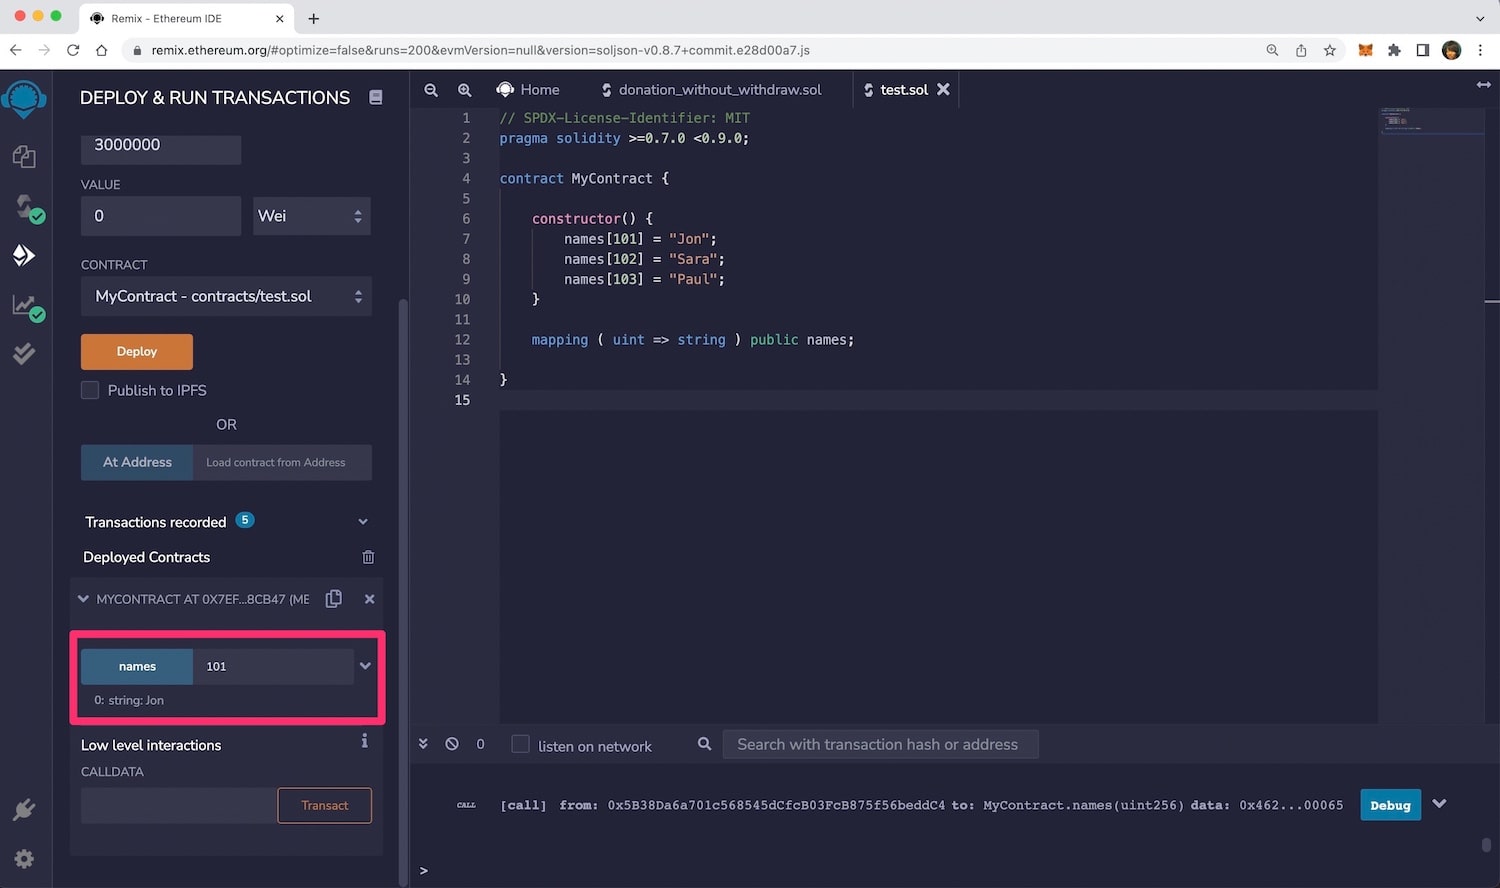
You can see names function in the red box and call stored data. For example, if we put "101", then get the name "Jon."
This time, we will create a donation contract. So the mapping is like so:
mapping ( uint => Person ) public people;
Using the code above, we can get data like the below:
- 1. Jon
- 2. Bob
- 3. Alice
Needless to say, we don't have data right now. So, in order to get the data like above, we need to create a function named addPerson.
How to add data to the blockchain
We can add a new person to the blockchain using the code below.
function addPerson(string name) public {
    id += 1;
    people[id] = Person(id, name, msg.value, msg.sender);
}
I will briefly explain the code above.
You can see the word public, which means everyone can use this function. There are four types of function types.
publiccan be used when contract was deployed, can be used in inherited contractexternalcan be used when contract was deployed , can NOT be used in inherited contractinternalcan NOT be used when contract was deployed , can be used in inherited contractprivatecan NOT be used when contract was deployed, can NOT be used in inherited contract
You can choose it case by case. Proceeding further, you can see the followings:
msg.valueis the ammount of ether sent.msg.senderis the address that has called a function.
Meaning of Memory
Actually, there is a mistake in the code above. The correct one is below:
function addPerson(string memory name) public payable {
    id += 1;
    people[id] = Person(id, name, msg.value, msg.sender);
}
You can see the word memory. So what's the heck of this? There are two types of keywords:
- string
memoryname - string
storagename
The difference is like so:
Memoryin Solidity is a temporary place to store data.Storageholds data between function calls.
This time, we use memory because we want to reset the string name whenever we use the addPerson function. Therefore, if we use a storage, the name stored in the blockchain will always be the same.
(3) Payable
Lastly, please take a look at below:
- function addPerson(string memory name) public {
- function addPerson(string memory name) public
payable
We can see the word payable. Functions declared payable can receive ether into the contract.
This time, we want to store donors' data and the amount paid, right? So we need to declare payable to receive ETH from donors.
Okay, that's it for the donation contract. Let's move to the Front End part. It's more fun.
Create a Front End with JS
All of the Front End code is below:
It's basic HTML and JavaScript. Five things you have to learn:
- (1) Basic HTML
- (2) Enable web3.js
- (3) Load from Smart contract
- (4) Read from Smart contract
- (5) Write to Smart contract
(1) Basic HTML
The HTML is straightforward. Don't forget to read web3.js in the section.
<script src="https://cdn.jsdelivr.net/npm/web3@latest/dist/web3.min.js"></script>
The code below will show three donators.
<h3>Donaters</h3>
<span id="people1"></span><span id="price1"></span><span id="address1"></span>
<span id="people2"></span><span id="price2"></span><span id="address2"></span>
<span id="people3"></span><span id="price3"></span><span id="address3"></span>
If you want to show more, you can use a code like so:
<?php for ($i=1; $i <= 10 ; $i++) { ?>
    <span id="people<?php echo $i; ?>"></span>
    <span id="price<?php echo $i; ?>"></span>
    <span id="address<?php echo $i; ?>"></span>
<?php } ?>
Enable web3.js
Using the code below, you can enable web3.js.
//Enable Web3
async function loadWeb3(){
    if(window.ethereum) {
        window.web3 = new Web3(window.ethereum);
    }
}

// Load function
async function load(){
    await loadWeb3(); //Enable Web3
}
load();
Load from Smart contract
Using the code below, you can load the smart contract.
// Load Contract
async function loadContract(){
    return await new window.web3.eth.Contract(
        [ Your ABI here ]
        ,'Your Contract Address');
}
The meaning of ABI
ABI is Application Binary Interface, which interacts with contracts in the Ethereum ecosystem, both from outside the blockchain and contract-to-contract interaction.
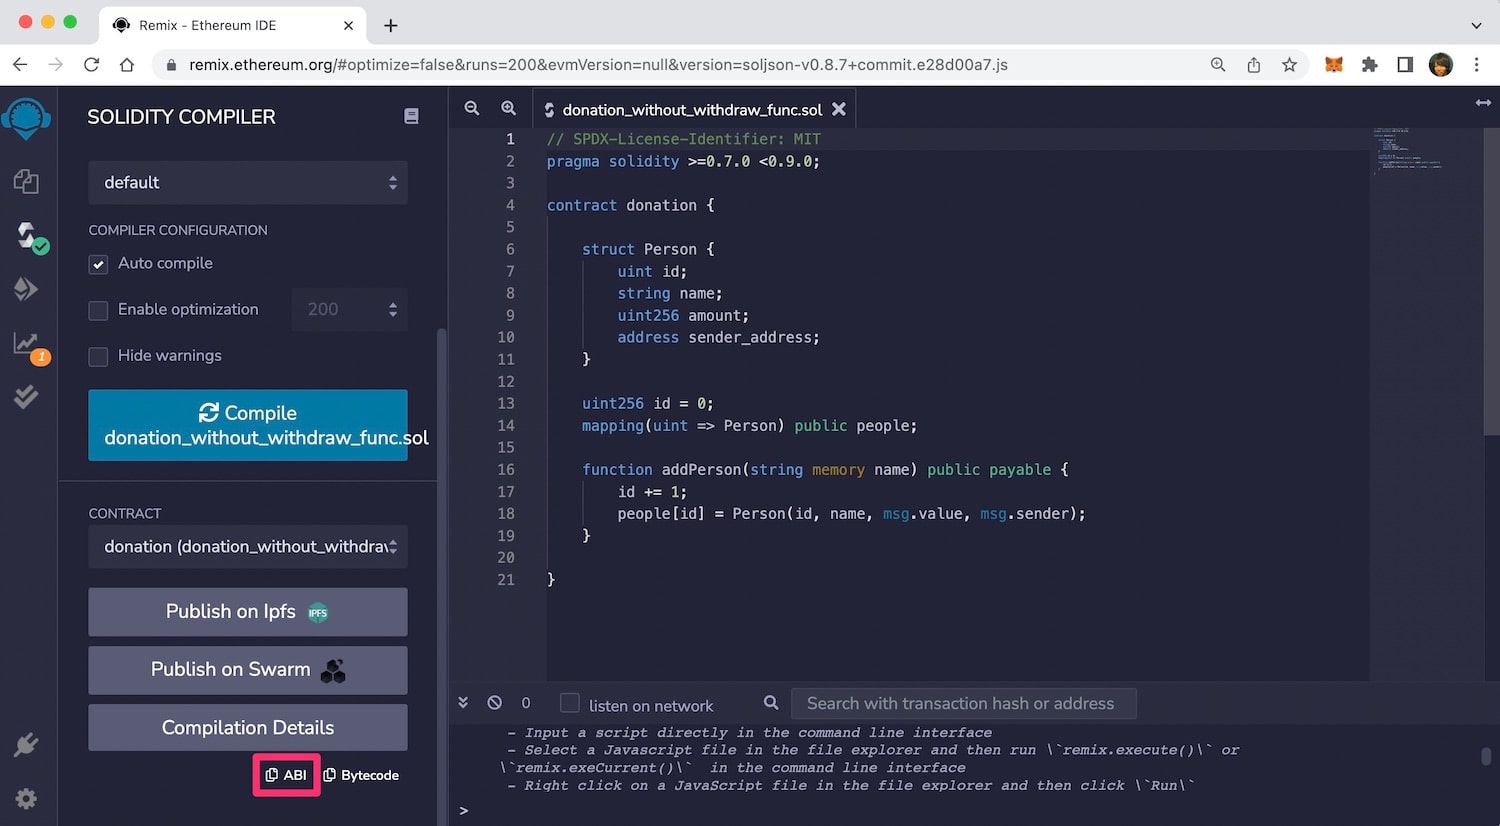
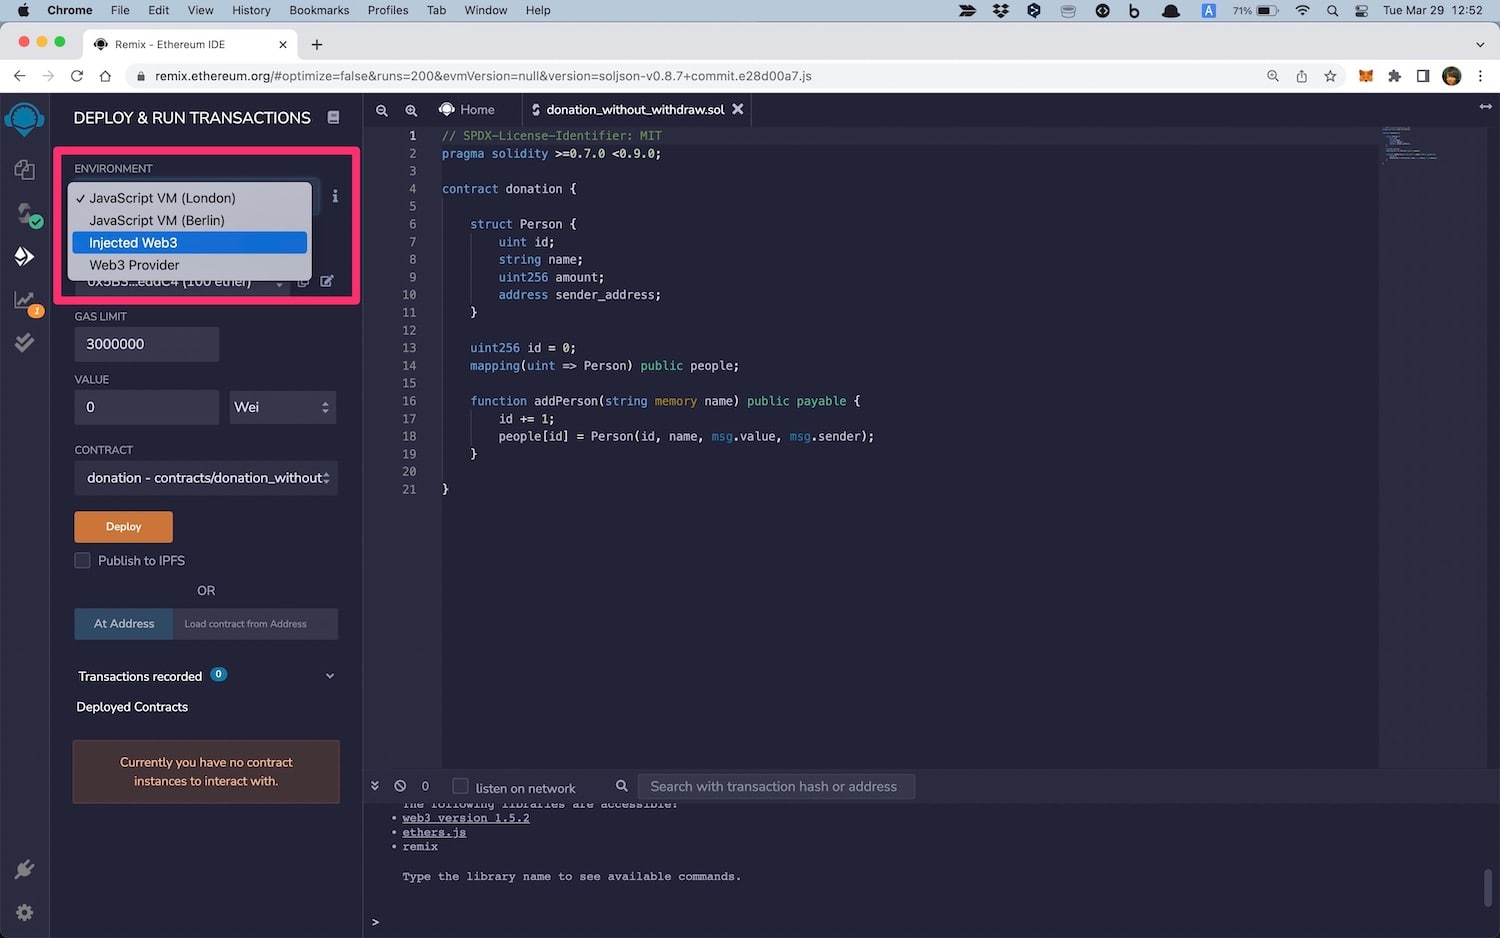
Injected Web3 when you deploy your contract so that we can interact with it using web3js.
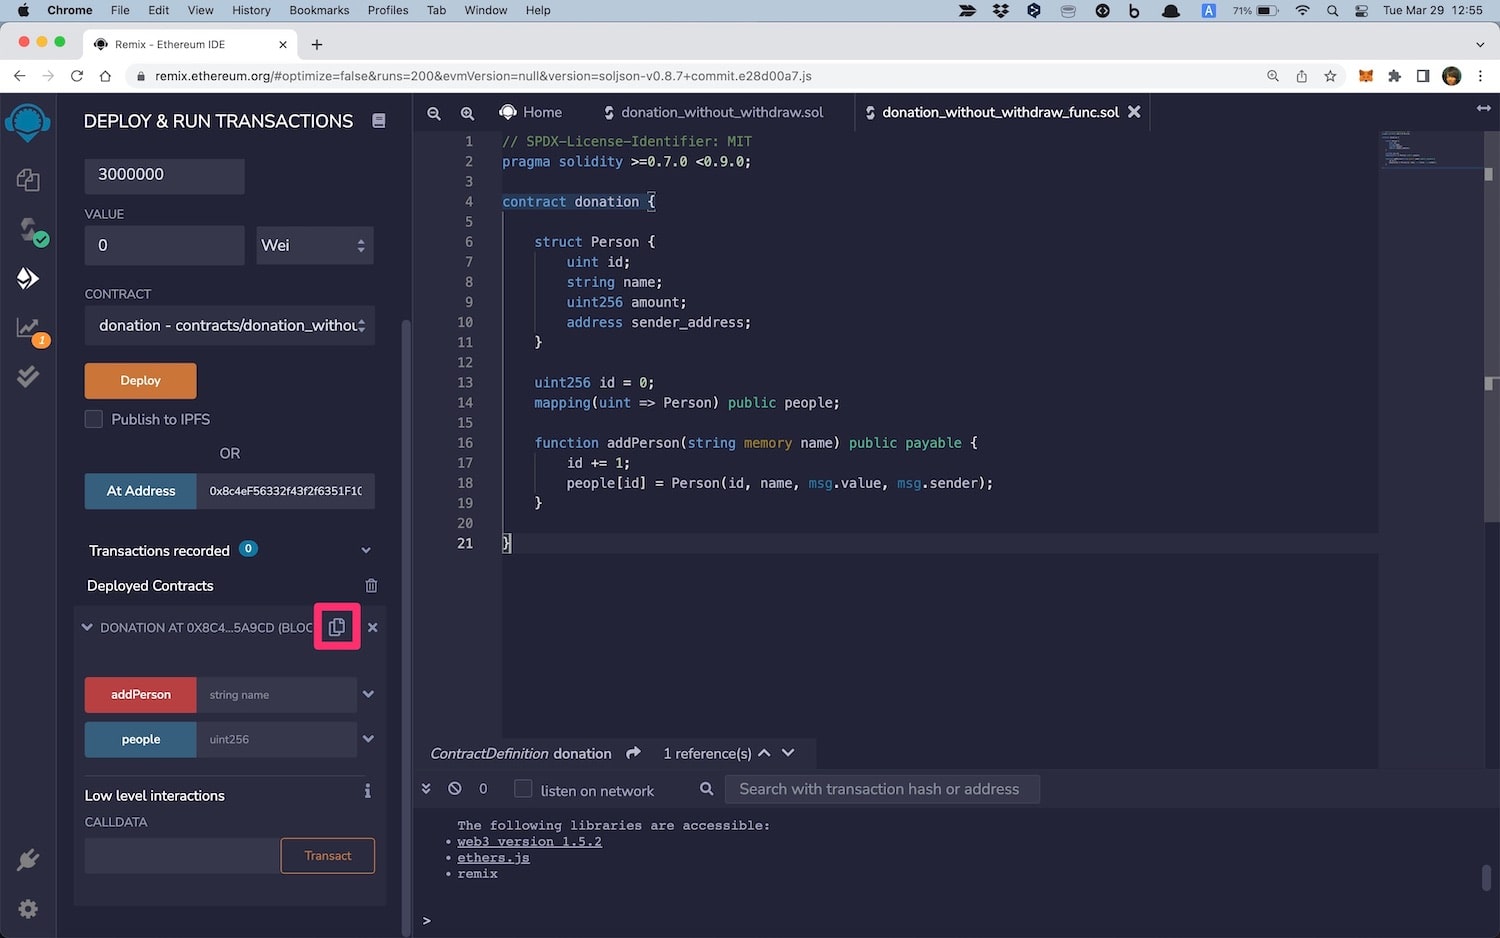
#### How to get your Contract Address
// Read data from the contract
async function getFunction() {

    // Read data of the first donor.
    get1 = await window.contract.methods.people(1).call();
    document.getElementById('people1').innerHTML = get[1];
    document.getElementById('price1').innerHTML = get[2];
    document.getElementById('address1').innerHTML = get[3];
}
The important thing is here:
window.contract.methods.people(1).call()
You can read your contract data like so:
window.contract.methods.methodName().call()
When you look at your ABI, you can see the method below:
{
    "inputs": [{ ... }],
    "name": "people",
    "outputs": [{ ... }],
    "stateMutability": "view",
    "type": "function"
}
This time, the function's name is people so that we can use it like so:
window.contract.methods.people().call()
But we need an argument, so do it like this:
window.contract.methods.people(1).call()
If you want to read the data more, you can do it like so:
// Read data from the contract
async function getFunction() {

    // Read data of the first donor.
    get1 = await window.contract.methods.people(1).call();
    document.getElementById('people1').innerHTML = get[1];
    document.getElementById('price1').innerHTML = get[2];
    document.getElementById('address1').innerHTML = get[3];

    // Read data of the second donor.
    get2 = await window.contract.methods.people(2).call();
    document.getElementById('people2').innerHTML = get[1];
    document.getElementById('price3').innerHTML = get[2];
    document.getElementById('address4').innerHTML = get[3];

    // Read data of the third donor.
    get3 = await window.contract.methods.people(3).call();
    document.getElementById('people3').innerHTML = get[1];
    document.getElementById('price3').innerHTML = get[2];
    document.getElementById('address3').innerHTML = get[3];
}
But obviously, the code is not clean. You can make it simple like so:
// Read data from the contract
async function getFunction() {
    for (let i = 1; i <= 100; i++) {
        get = await window.contract.methods.people(i).call();
        document.getElementById('people' +i).innerHTML = get[1];
        document.getElementById('price' +i).innerHTML = get[2];
        document.getElementById('address' +i).innerHTML = get[3];
    }
}
Looks much better, but we still have a problem because the code above will continue until i becomes 100, even though we only have a fewer donors.
To solve the problem, we can do like this:
// Read data from the contract
async function getFunction() {
    for (let i = 1; i <= 100; i++) {
        get = await window.contract.methods.people(i).call();
        if ( get[0] != 0 ){ // Continue for a loop until the ID is not equal to 0.
            document.getElementById('people' +i).innerHTML = get[1];
            document.getElementById('price' +i).innerHTML = get[2];
            document.getElementById('address' +i).innerHTML = get[3];
        } else break;
    }
}
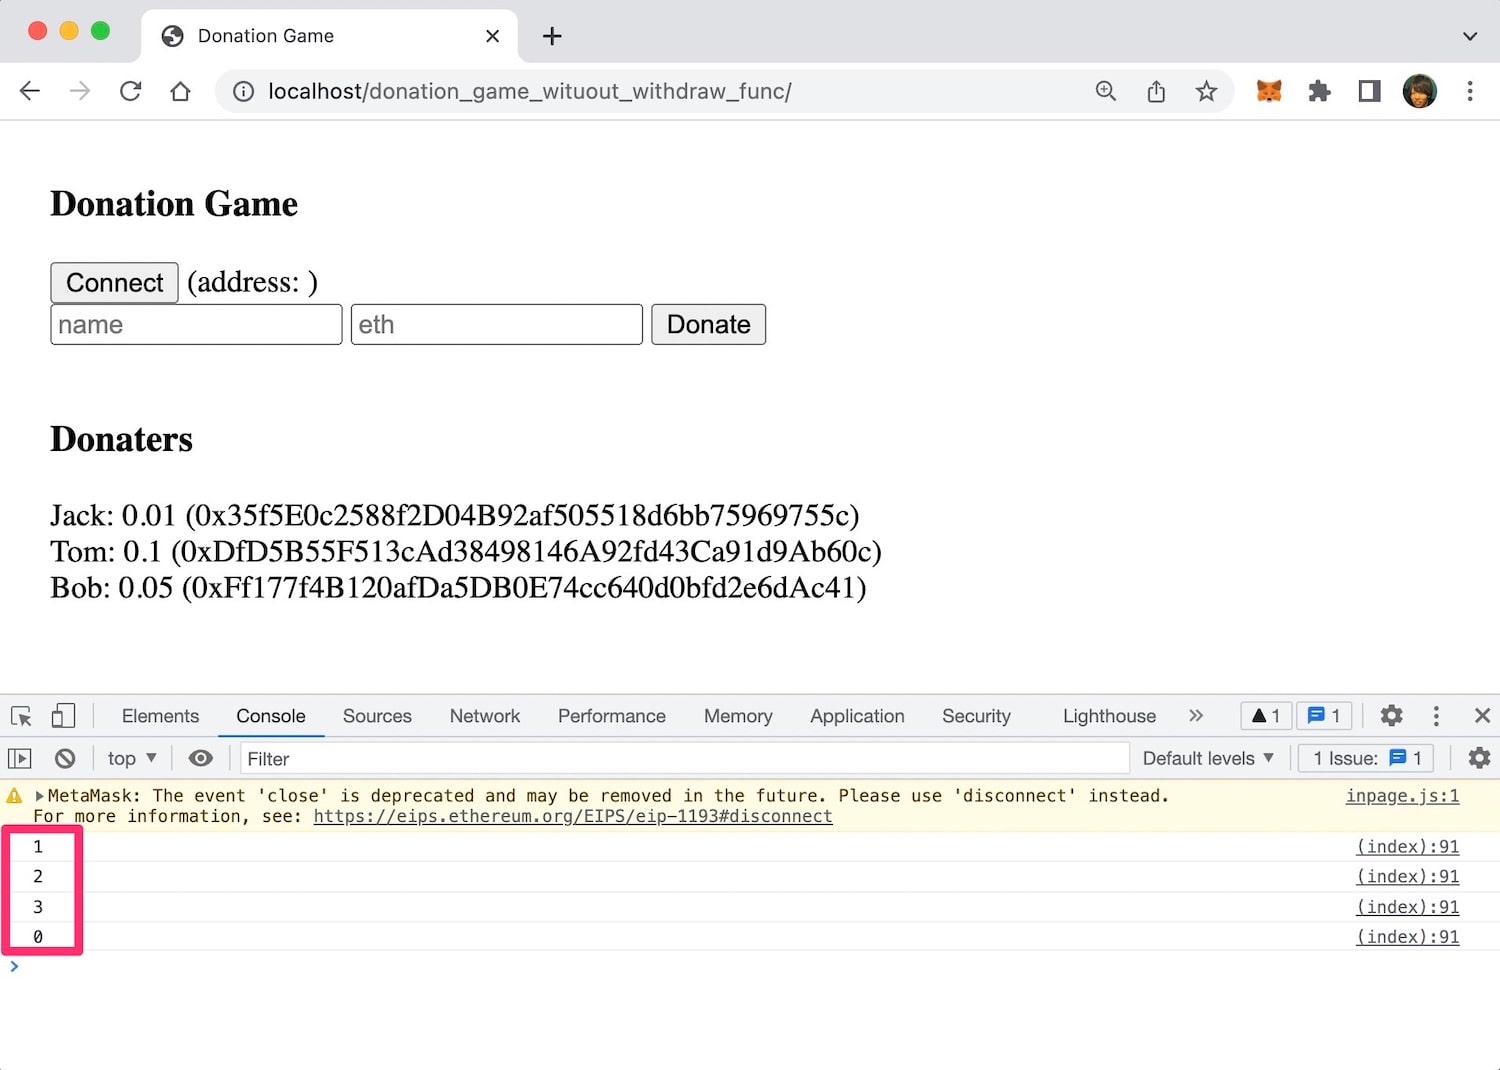
The code above will stop their loop if the donor's ID becomes 0, which means there are no donors more than that. If the code looks complicated, you can test it like so:
// Read data from the contract
async function getFunction() {
    for (let i = 1; i <= 100; i++) {
        get = await window.contract.methods.people(i).call();
        console.log(get[0]);
        if ( get[0] != 0 ){ // Continue for a loop until the ID is not equal to 0.
            document.getElementById('people' +i).innerHTML = get[1];
            document.getElementById('price' +i).innerHTML = get[2];
            document.getElementById('address' +i).innerHTML = get[3];
        } else break;
    }
}
When you open the console of your browser, you can see as follows:
Lastly, please edit your code like so:
get[2]/1000000000000000000; // Change wei to ETH
We need it because the amount read from the contract is Wei, the smallest denomination of ether. So we can multiply it 1000000000000000000 times, which will become ETH.
Write to Smart contract
All the code is below:
// Donate function
async function donateFunction() {

    // Get the name from input box
    $name = document.getElementById('your_name').value;

    // Get the amount from input box
    $wei = document.getElementById('your_eth').value;

    // Change wei to ETH
    $eth = $wei * 1000000000000000000;

    // Get donor's wallet address
    $account = await getAccount();

    // Write to Smart Contract
    await window.contract.methods.addPerson($name).send(
        {
            from: $account,
            value: $eth
        }
    );
}
The important thing is below:
await window.contract.methods.addPerson($name).send(
    {
        from: $account,
        value: $eth
    }
);
Let me explain them one by one.
How to use .send() method
When we want to read from the smart contract, we use the .call() method.
On the other hand, we use the .send() method to write some data to the blockchain. We use it like so:
window.contract.methods.methodName(value).send(
    {
        from: account
    }
);
This time, we want to input the data of name, address, and amount of ETH sent. Please take a look at ABI below:
{
    "inputs": [
        {
            "internalType": "string",
            "name": "name",
            "type": "string"
        }
    ],
    "name": "addPerson",
    "outputs": [],
    "stateMutability": "payable",
    "type": "function"
},
We can see the word inputs, which says the name is "name." So the code should be like this:
window.contract.methods.addPerson($name).send(
    {
        from: $account,
        value: $eth
    }
);
We input the argument of $name and also $account and $eth. If you want to define gas data, you can do it like so:
window.contract.methods.addPerson($name).send(
    {
        from: $account,
        value: $eth.
        gas: 1500000,
    }
);
For more detail of how to use .send(), please visit web3.eth.Contract. Okay, that's all for the explanation. I hope this article helps many people.